Setting up auto-icon#
Important
If not stated differently, the following instructions for setting up auto-icon have to be followed on the Autosubmit server or your local server, if Autosubmit is installed there.
Steps to perform#
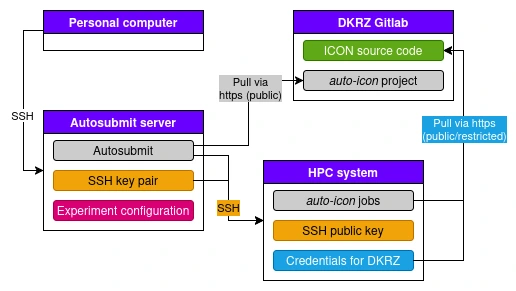
A few steps need to be set up to run auto-icon. These are required to ensure automatic access between the involved systems (see figure).
Note
In case you have installed Autosubmit locally, the “Personal computer” and “Autosubmit server” are the same machine slighly simplifying the above figure. However, this should not affect the remainder of the document.
The Autosubmit server can access the auto-icon repository via https always, as the repository is publicly available, i.e. does not require credentials (grey connection). Further, Autosubmit requires to access the HPC system of choice via SSH. To do so, an SSH key pair is required and the public key stored on the HPC system (orange connection). Last, the BUILD_ICON job that runs on the HPC system, needs to pull the ICON source code from the DKRZ Gilab (and also a few other tools like DWD_ICON_TOOLS, SAMOA, etc.). If only the public ICON version is used, this connection does not require credentials, otherwise the credentials need to be stored (turquoise connection).
To enable all these, please do the following steps (these are shortly covered in the shortest guide to success):
(orange connection) Create an SSH key pair (create key) and add the key to the HPC system. Before running an experiment, the key needs to be unlocked.
(turquoise connection; non-public ICON versions only) set up credentials manager on the HPC system to access DKRZ Gitlab via https (instructions).
Additionally, two setup steps need to be done. These steps are also included in the Step-by-Step guide and the Shortest guide to success.
(art and seamlss cases only): set up default HPC environment
Add a file with your user and project IDs. Follow the respective instructions in the step-by-step guide. It is convenient to do this after creation of your first experiment.
HPC system to DKRZ Gitlab#
Important
The following steps should be carried out on the HPC system
Note
These steps are only required if a non-public repository is used.
Create a file on the respective machine ~/.netrc with the following content. Leave out the field for the personal access token for a moment.
machine gitlab.dkrz.de
login <your login name>
password <your personal access token>
While you could use your actual password, it is strongly recommended to not store the actual password there but use a personal access token (PAT) for that purpose. It can be limited in functionality (e.g. only for reading the repository) and can be set to an expiry date, increasing security significantly against your password. Thus, we recommend to follow the instructions to set up a PAT.
Set up a personal access token (PAT):
Follow these instructions to create a PAT with the scope read_repository. Enter the PAT into the field for the PAT in the ~/.netrc file on the HPC system.
Update the git configuration to use the netrc credentials manager:
git config --global credential.helper "netrc"
Test whether it worked by cloning the repository by hand:
git clone https://gitlab.dkrz.de/icon/icon-kit.git
If it works without asking for a password, everything worked out. You can remove the cloned repository again afterwards.
Important
A different credentials manager is highly recommended but not available on all HPC systems.
Managing ssh keys#
Create an ssh key#
Important
If not stated differently, the following instructions for setting up auto-icon have to be followed on the Autosubmit server or your local server, if Autosubmit is installed there.
To create an ssh key, change to the directory ~/.ssh and run
ssh-keygen -t ed25519 -f <key_filename> -C "<comment>"
with an appropriate file name (e.g. containing the system to connect to) and an arbitrary comment. The comment will be included in the public key file and helps you and others to associate the key correctly. Thus, common comments include your name or email, the creation date or some identifier for the machine holding the private key.
Two files should have been created, the private and the public key:
~/.ssh/<key_filename>
~/.ssh/<key_filename>.pub
Add an ssh key#
Important
If not stated differently, the following instructions for setting up auto-icon have to be followed on the Autosubmit server or your local server, if Autosubmit is installed there.
You need to add the public part of the ssh key to the target system. On some systems, it can be done with
ssh-copy-id -i ~/.ssh/<key_filename> <user>@<host>
However, for HoreKa, Levante and many other systems, the key has to be added through the web interface. Follow the instructions of your HPC system for this (for HoreKa, for Levante):
You can check the connection with ssh -T <user>@<host>, e.g.
ssh -T -i ~/.ssh/<key_filename> <levante_username>@levante.dkrz.de
Unlock ssh keys with ssh-agent#
Important
If not stated differently, the following instructions for setting up auto-icon have to be followed on the Autosubmit server or your local server, if Autosubmit is installed there.
To unlock the passphrase-secured key on the local system you can use the ssh-agent. For each session, you have to run the following two commands. Start the ssh-agent:
eval $(ssh-agent -s)
For each key (and thus HPC system) you want to have unlocked in the current session run:
ssh-add ~/.ssh/<ssh_key_name>
and enter the password for the key.
You can also put the first of the two commands into your ~/.bashrc file or add a function there for these commands.
Note on 2-factor-authentication (2FA)
Remote machines secured by 2FA cannot be accessed as easily by automated workflows. Some machines like Horeka support 2FA with an ssh key for some limited amount of time. In this case, you can do the 2FA with a manual login and then start the Autosubmit run. If there is not such option, automated workflows are likely not supported on the respective machine. You are encouraged to talk to the administrators to find a solution.
Important security note on ssh-agent
The ssh-agent has to stay alive for autosubmit run to properly access the remote machines. However, that also means, it will survive logouts and everything except a reboot. Thus, please kill your ssh-agent processes regularly when not in use anymore. This can be done with ssh-agent -k for an agent in the current session or with pkill -u $(whoami) ssh-agent to kill all your ssh-agents.
Set up default HPC environment#
Note
These setup steps are only required for the art and the seamless case.
The templates use a default environment for input and output directories. It is fully optional to adjust to this environment. If you do so, follow the steps below to set this up.
If you do not want to do so, set the default values for the prefix directories in %PROJECTPATH%/conf/common/platforms/<platform>.yml.
The steps to perform differ by HPC system.
For details, check out the page on configuration details.
Levante#
In your ~/.bashrc file you should source a profile to allow loading of modules: source /sw/etc/profile.levante.
The input directory will be located in /work/<project>/<user>/input/<expname> and the output in /scratch/<l>/<user>/output/<expname> (<expname> is the experiment name that you give when configuring auto-icon for a specific experiment and <l> is the letter of your user name). Please create the input directory.
HoreKa#
The default workspace to use is called auto-icon. Just create a workspace called auto-icon.
The input and output directories will then be located in <workspace auto-icon>/input/<expname> and <workspace auto-icon>/output/<expname>, respectively.
Alternatively, you can change the workspace name in your auto-icon experiment configuration (%PROJECTPATH%/conf/common/platforms/<platform>.yml: DIRECTORIES:WORKSPACE_NAME:)